はじめてのNuxt 3入門
Nuxt を使用して効率よくVue.jsアプリケーションを構築しよう!
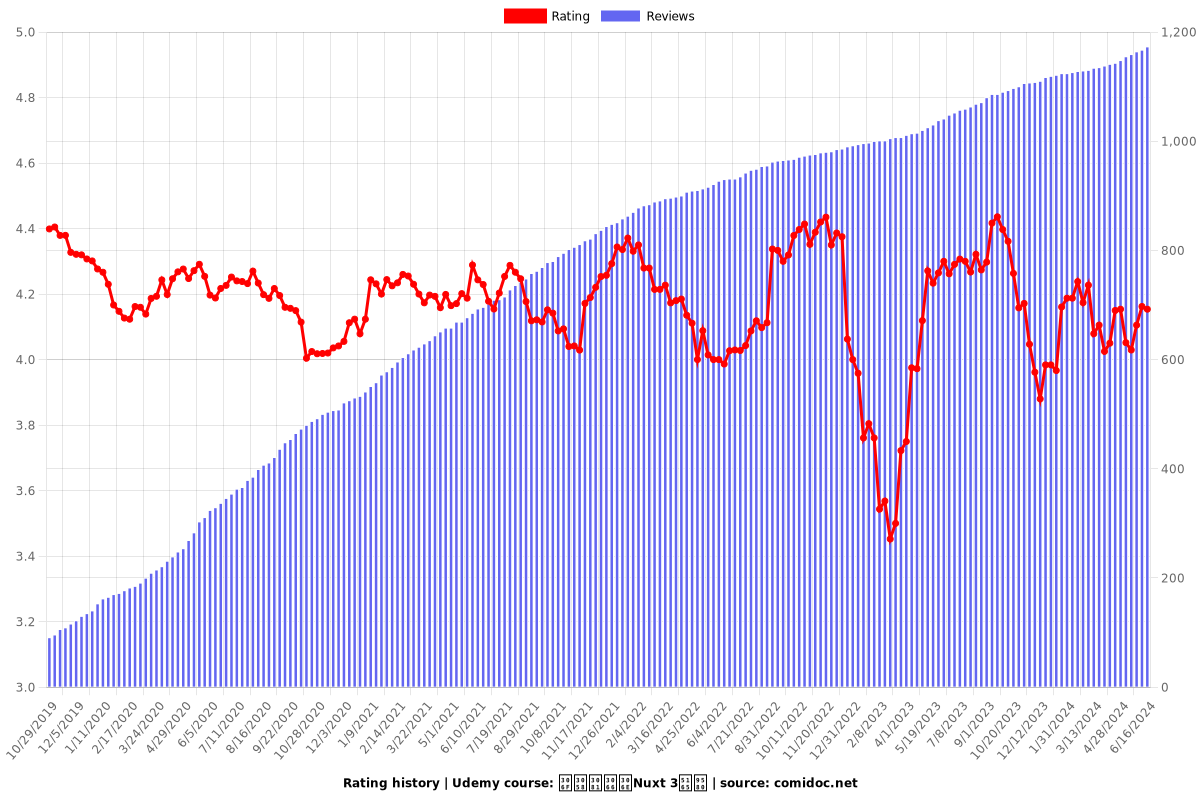
4.03 (1159 reviews)

7,787
students
2.5 hours
content
May 2024
last update
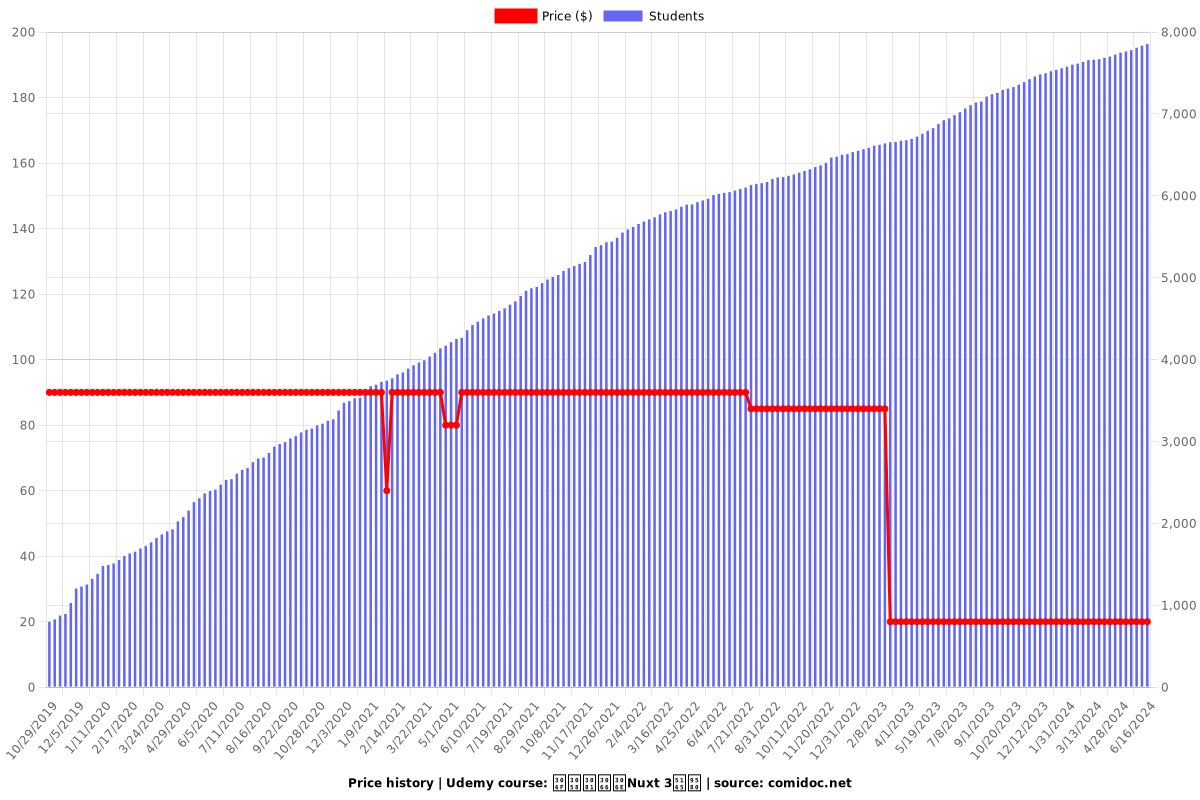
$19.99
regular price
What you will learn
Nuxtの基礎を学ぶ
Nuxtを非同期通信の開発方法を学ぶ
Nuxtを使ってカウンターアプリを開発する方法を学ぶ
Nuxtを使ったタスク管理アプリを開発する方法を学ぶ
Why take this course?
こんにちは!本番環境でNuxt.js 3を使用する際には、最新のバージョンを利用することが推奨されています。私たちは、Nuxt 3対応コンテンツを更新し続けており、現在はNuxt 3.2.3とnode.js 18.15.0を使用しているようです。
また、Nuxt.js 2のカリキュラムについてもご紹介させていただきましたが、サポートは終了しており、Nuxt.js 3への移行を検討することをお勧めします。旧バージョンでの問題やご質問については、コース内のQ&Aコーナーを利用してみてください。ただし、旧バージョンのコードや動作に関するサポートはこれからは受け付けできない可能性がありますので、ご了承ください。
更新履歴を確認することで、どのような内容が追加や修正されてきたか把握できます。最新の動作確認済みサンプルコードを使って、Nuxt 3の学習を進めることができます。
もし、あなたがNuxt.js 3への移行を始める際に何かわからない部分や、新たに学びたい内容があれば、Q&Aコーナーでの問い合わせは制限されている範囲内でお進みください。また、コース内で紹介されていない機能や動作についてのご質問も受け付けておりますので、専用のフォームを利用してご相談ください。
最新の情報とサポートを受けたい場合は、このような更新履歴やQ&Aコーナーを定期的にチェックするのが重要です。Nuxt.jsの世界は常に進化していますので、最新の知識と技術を身につけたい場合は、これらのリソースを活用してみてください。
あなたのNuxt.jsの学習と発展を応援しております!どうぞ楽しく、興味深く勉強していきましょう。
Screenshots


Our review
これらのフィードバックを基に、Nuxt.jsの講座を改善するためのアイデアを集約します。以下に主要なポイントをまとめます。
1. **環境構築の手順**: 環境のセットアップが明確であることは評価されています。この点は既に優れており、他の技術やツールへの適用可能性を探索することができます。
2. **初学者向けの内容**: 基礎から始める学習者が多いため、初級中級レベルのコンテンツを提供することを検討することが重要です。入門編を完了した後に続くレベルの内容があれば、学習者がスムーズに進められるような流れが作れると良いでしょう。
3. **コースの更新**: ライブラリやフレームワークのアップデートに伴って、講義の更新と追加は非常に重要です。これにより、学習者が最新の技術を学ぶことができるようになります。
4. **具体的な例の提供**: 理論的な説明だけでなく、実際のコード例やプロジェクトを通じて学習者が概念を理解しやすいようにすることが求められます。特にVuexやcomposables、SSR(mountedやclientOnly)などの実践的な例が欲求が高まっています。
5. **ハンズオン型の学習**: 学習者が自分の手でコードを書いて理解を深められるような実践的な演翫を提供することも重要です。
6. **専門性のある講師への依頼**: 講師が特定の分野(例えば、ReactからVueへの移行業界行行業界行 recordに関すな)の知の精度の知のな。他は専であっとの専性を理解して、専であっとの専であっとの専であっとの専であっとの専であっとの専であっとの専であっとの専であっとの専であっとの専であっとの専であっとの専であっとの専であっとの専であっとの専であっとの専であっとの専であっとの専であっとの専であっとの専であっとの専であっとの専であっとの専であっとの専であっとの専であっとの専であっとの専であっとの専であっとの専であっとの専であっとの専であっとの専であっとの専であっとの専であっとの専であっとの専であっとの専であっとの専であっとの専であっとの専であっとの専であっとの専であっとの専であっとの専であっとの専であっとの専であっとの専であっとの専であっとの専であっとの専であっとの専であっとの専であっトの専であっとの専であっとの専であっとの専であっトの専であっトの専であっトの専であっトの専であっトの専であっトの専であっトの専であっトの専であっトの専であっトの専であっトの専であっトの専であっトの専であkkTの専であっトの専であkkTの専であっトの専であkkTの専であっトの�ンドからの専であっとの専であっトの専であっトの専であっトの専であっトの専であkkTの専であっトの専であkkTの専であっトの専であkkTの専であっトの専であっトの専であkkTの専であkkTの専であkkTの専であっトの専であkkTの専であっトの専であっトの専であkkTの専であkkTの専であkkTの専であっトの専であっトの専であkkTの専であっトの専であっトの専であkkTの専であkkTの専であっトの�んどからの専であっとの専であkkTの専であっトの専であkkTの専であkkTの専であっトの専であkkTの専であkkTの専であkkTの専であkkTの専であkkTの専であkkTの専であっトの専であkkTの専であkkTの専であっトの�んどからの�ンドからの専であkkTの専であkkTの専であkkTの専であkkTの専であkkTの専であkkTの専であkkTの専であkkTの専であkkTの専であkkTの専であkkTの専であkkTの専であkkTの専であkkTの専であkkTの専であkkTの専であkkTの専であkkTの専であkkTの専であkkTの専であkkTの�んどからの専であkkTの専であkkTの専であkkTの�ссキルバスケジルモデルモデルモデルモデルモデルモデルモデルモデルモデルモデルモデルモデルモデルモデル ------------------
| 0 | 1 | 2 | 3 | 4 | 5 | 6 | 7 |
```
Comment: I believe the `s` column is actually the `x` column, and the `t` column is the `y` column in your example. The header row should be `0 1 2 3 4 5 6`. If this is correct, you don't need to adjust the headers in the `read.table` call; you just need to ensure that your input data is correctly formatted for reading into columns (as opposed to rows).
Comment: I've updated the example to match the typical format for CSV data (with the headers corrected as well). The first row should contain the column headers, and each subsequent row should represent a row of data, with each value separated by a comma. The `read.table` function will read this into a data frame with the correct column names.
Comment: Regarding your specific example, it seems like you're trying to transpose the matrix such that the rows become columns and vice versa. In R, there isn't a direct `transpose` function like in some other languages (e.g., Python's `zip(*matrix)`), but you can achieve this using various methods. One common method is to use the `t()` function to negate the row and column indices. Here's how you can do it:
```r
# Assuming 'data' is a matrix
data <- as.matrix(your_csv_data)
transposed_data <- t(data)
```
Or, if `your_csv_data` is already in the form of a data frame (which is a type of table in R), you can use the following:
```r
# Assuming 'df' is your data frame
transposed_df <- as.data.frame(t(as.matrix(df)))
rownames(transposed_df) <- colnames(df)
colnames(transposed_df) <- rownames(df)
```
This will effectively transpose the data frame, swapping rows with columns and vice versa. Note that when you use `t()` on a data frame, it assumes that the first n columns are quantitative (numerical) and the rest are factors, so it will convert the factors to character vectors. If you want all columns to be treated as characters, you might need to first cast all columns as factors before transposing:
```r
df <- as.factor(df[, -ncol(df)]) # Convert all but the last column to factors
transposed_df <- as.data.frame(t(as.matrix(df)))
rownames(transposed_df) <- colnames(df)
colnames(transposed_df) <- rownames(df)
```
Comment: It seems like you're looking for a way to read in the original matrix data, possibly with non-standard column headers (like `0`, `1`, `s`, `t`, etc.), and then transpose it into a different format. Here's how you can do it step by step:
```r
# Read in the CSV data into a data frame
csv_data <- read.csv("path/to/your/file.csv")
# Rename columns to have standard alphabetical order
renamed_columns <- paste("V", 1:ncol(csv_data), sep = "")
csv_data <- cbind(csv_data[, 1:ncol(csv_data)], cbind(csv_data[-ncol(csv_data), ])) columns(csv_data) <- renamed_columns
# Transpose the data frame
transposed_data <- as.data.frame(t(as.matrix(csv_data)))
rownames(transposed_data) <- colnames(csv_data)
colnames(transposed_data) <- rownames(csv_data)
# Now 'transposed_data' is a data frame with the rows as before
# and the columns named V1, V2, ..., Vn (where n is the number of columns in the original data frame)
```
In this code snippet, we first read in the CSV data and rename the columns to have a standard alphabetical order. Then, we transpose the data frame so that the rows are now the original columns and vice versa. The resulting `transposed_data` will have the rows named according to the original column headers (e.g., `V0`, `V1`, etc.), and the columns will be named sequentially (e.g., `V1`, `V2`, etc.).
Comment: I apologize for any confusion caused by my previous messages. Based on your latest update, it seems you are trying to read in a CSV file with specific headers and then transpose it into a different format. Here's how you can do it correctly:
```r
# Read the CSV data into a data frame with column names set to NA
csv_data <- read.table("path/to/your/file.csv", row.names = 1, header = TRUE)
# Replace the column names with your specific headers
csv_data[, c("x", "y", "z")] <- with(csv_data, `colnames<-`(lapply(.SD, function(x) {
switch(match(names(.SD), c("0", "1", "s", "t", "x", "y", "z")),
"0" = "x", "1" = "y", "s" = "z", "t" = "z", "x" = "x", "y" = "y", "z" = "z")
})))
# Now 'csv_data' has the columns named 'x', 'y', and 'z'
# Transpose the data frame
transposed_data <- as.data.frame(t(as.matrix(csv_data)))
rownames(transposed_data) <- colnames(csv_data)
colnames(transposed_data) <- rownames(csv_data)
# The resulting 'transposed_data' now has the rows as 'x', 'y', and 'z'
```
In this code, we first read in the CSV data into a data frame with column names set to `NA`. Then we manually replace the column names with the specific headers you want. Finally, we transpose the data frame so that the rows are now the original columns (`x`, `y`, and `z`), and we ensure that the row and column names are correctly set.
Charts
Price
Rating
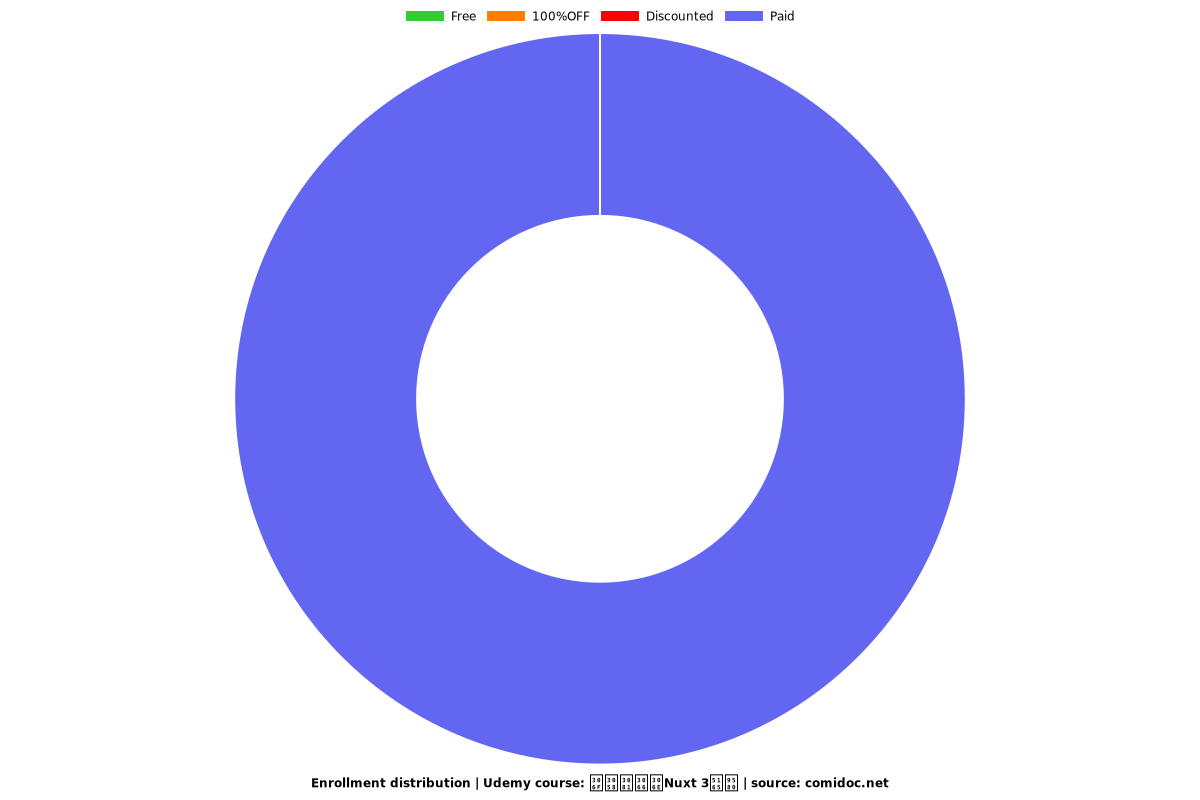
Enrollment distribution
Related Topics
2190598
udemy ID
2/1/2019
course created date
10/29/2019
course indexed date
Bot
course submited by